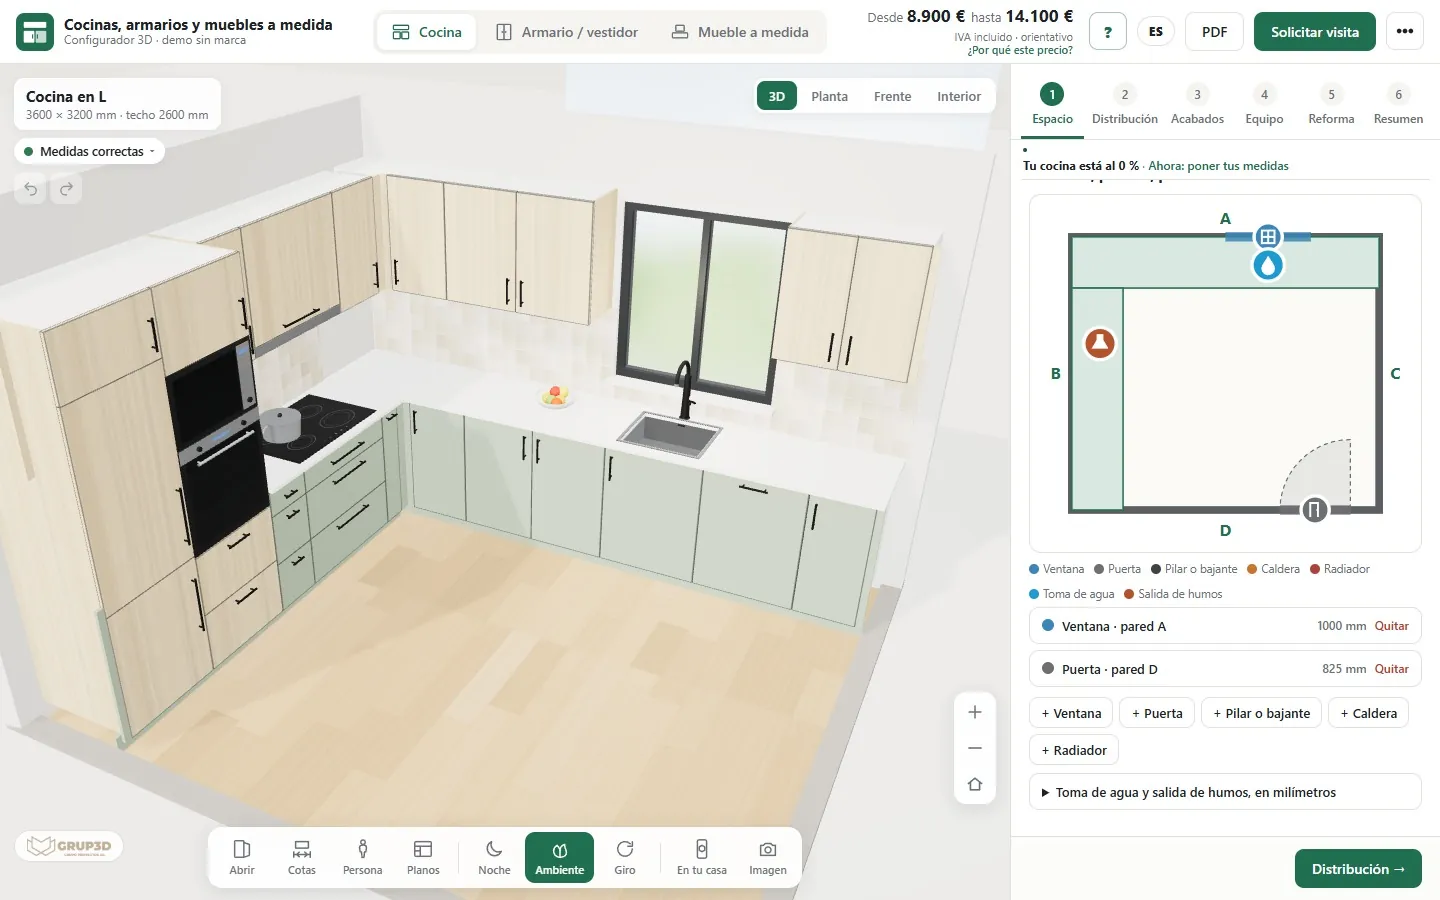
3D kitchen configurator from the Grup3D demo at the measurements step, with the room plan and the options panel: the starting point for building a 3D configurator
GUIDE · 4 DECISIONS · 4 STEPS · 5 MISTAKES
— GUIDE FOR MANUFACTURERS · 2026

How to build
a 3D configurator
for your website.

“We want a 3D configurator” usually starts with the 3D and ends with the rules: what can be chosen, what cannot be manufactured and where the price comes from. This guide puts the work in order: what to decide beforehand, what is needed from your side, the four steps of a project and what can be saved by starting from a base that already works.

— FOUR DECISIONS

Four decisions
before programming anything.

The four things that change the whole project. If they are clear, the rest is work; if not, the configurator gets rebuilt twice.

01 · WHICH PRODUCT

One family first

Not the whole catalogue: the family that sells most made-to-measure or generates most enquiries. A window, a sofa, a shelving bay. The rest is added later on the same base. In the kitchen demo, for example, the kitchen came first and the wardrobes and bespoke furniture later, with the same board and edging rules.

02 · WHAT COMES OUT AT THE END

Image, price, PDF or order

This is the decision that sets the level: a visual configurator shows the product and lets the customer ask; one with rules gives the price and the order sheet; a technical one produces the cutting list. Decide what your factory, or your supplier's, has to receive when the customer finishes.

03 · WHERE IT LIVES

Your website, your network's or the shop

On your website with one line of code, on each distributor's website with their area and their margin, on the shop's tablet or inside the online shop. Each place asks for different things: users, margins, add to basket. See configurator in the online shop.

04 · WHO USES IT

End customer, installer or sales rep

A private customer needs guiding and warning about what does not fit. An installer wants to enter measurements from the site on their phone. A sales rep wants the discount and the PDF with their brand. The same configurator can have all three flows, but you need to know that beforehand.

— WHAT IS NEEDED

What is needed
from your side.

You already have almost all of it. The work is putting it in order, not inventing it.

The range. Families, types, sizes, materials, colours and extras that you really manufacture or sell, with their references. A PDF catalogue, an Excel sheet or your current website will do. Anything not in the range cannot be chosen, and that is a good thing: it avoids orders that cannot be made.

The rules. Minimum and maximum sizes per series, weights per sash or per module, combinations that never leave the factory, which accessory goes with each use and which calculation is needed: the power supply for an LED strip, the lux for a room, the pallet positions of a shelving bay, the cutting list of a sliding door. They usually live in a technical-office Excel and in the foreman's head; they get put in order in a document you sign off before programming. More in from the manufacturer's Excel to the web configurator.

The price list. Prices per unit, metre or module, extras, transport and installation by area, discounts per distributor or by volume. In the configurator the price list lives apart from the code and you change it yourself from the panel.

The files. CAD, drawings, data sheets, photos or samples. 3D models are not required: if there is CAD it is used and, if not, the product is modelled. Profiles are not modelled one by one; they are built from their sections and respond to any size; complex parts (carriages, handles, pumps) are modelled or adapted from your files. 3D modelling and materials or finishes are priced separately, at €30 to €120 per part or finish (or more).
— THE FOUR STEPS

The four steps
of a bespoke configurator.

Starting from a base that already works in 48 configurators: you do not pay for development from scratch and the work focuses on loading what is yours.

  1. 01

    Range and rules, in writing

    The range is put in order and the rules are written in a document that you approve. Before starting, what is and is not in the project is set down in writing, with a fixed price.

  2. 02

    The 3D and the flow

    The product is modelled or adapted, finishes and fabrics are loaded, and the flow is assembled: steps, options, warnings and what comes out at the end (PDF, order sheet, cutting list). The customer sees the product change in the browser, on computer, tablet and phone.

  3. 03

    Price list, network and testing

    The price list is loaded with its areas and discounts, the distributor areas are created if there are any, and it is published at a password-protected test address. Your team uses it with real orders and it is checked against the test cases until everything matches. See how a technical configurator is validated.

  4. 04

    Website, training and go-live

    It is embedded in your website and your network's with one line of code, the sales team is trained and requests start arriving in the panel and by email. Rules and price lists are updated afterwards without touching the design.

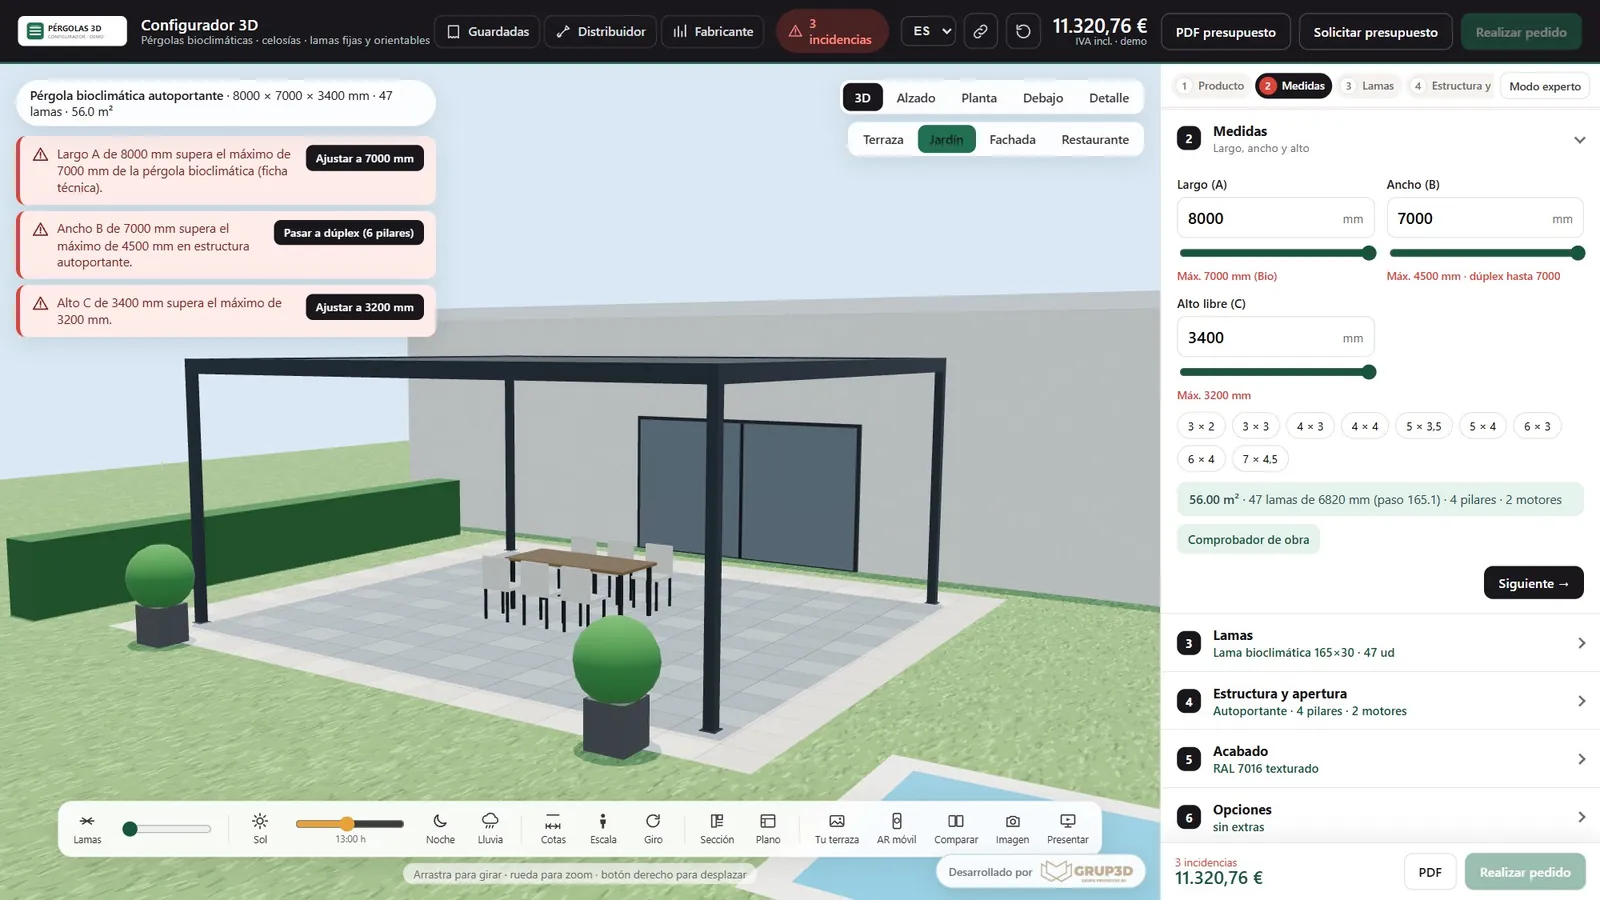
3D pergola configurator from the demo with warnings about sizes that exceed the manufacturing maximums and buttons to correct them in one click
The rules as the customer sees them: the warning and the way out in one click. This is what gets written in step 01. Sample products and prices.
— WHAT COMES FROM THE BASE

What comes ready-made
and what is developed bespoke.

Building a configurator from scratch takes months. Starting from a base that already calculates, warns and produces documents changes the lead time and the price.

— WHAT THE BASE ALREADY DOES
  • 3D in the browser on computer, tablet and phone, with nothing to install, with augmented reality without an app.
  • The rules and pricing engine: options that switch on or lock, warnings with an alternative, indicative price recalculated with every change.
  • The documents: PDF for the customer, order sheet with references and quantities, link, image and QR code for every design.
  • The requests panel with their status, exportable to CSV and with an email alert.
  • The distributor area with user, discount, margin and their own brand on the PDFs.
— WHAT GETS DEVELOPED IN YOUR PROJECT
  • Your range, your rules and your price list, with the calculations specific to your product.
  • The workshop documents you need: parts list, cutting list, DXF, CSV for the cutting software.
  • The add-to-basket step in your online shop and the connection to your ERP or CRM, if you have them: they do not come ready-made; they are developed bespoke.
  • An AI assistant that fills in the configurator from a sentence, if you want it. See configurator with AI.
  • Other languages for the interface and the documents, as part of the project.
— FIVE MISTAKES

Five mistakes
when building a 3D configurator.

The ones that leave most configurators half-finished or unused. All of them are avoided in step 01.

01

Starting with the 3D

A beautiful product that spins and does not know what cannot be manufactured is a viewer, not a configurator. The rules and the price list are the project; the 3D is what you see.

02

No test cases

If there are no real orders to compare against, nobody knows whether it calculates correctly. Between ten and thirty orders already manufactured per family, solved by your technical office, before publishing.

03

The price list inside the code

If changing a price means calling the programmer, the configurator goes stale within a year. The price list and the rules have to be editable from the panel, with versioning.

04

Forgetting the phone and the network

The installer uses it on site and the distributor with the customer in front of them. If it only works on the office computer, it gets little use. And if the network has no area of its own, it keeps calling the factory.

— LEAD TIMES AND PRICE

How long it takes
and how much it costs.

Developments start from €6,500 for a visual configurator of one product family; most projects for manufacturers fall between €14,500 and €35,000, depending on the catalogue, the rules and the integrations, plus maintenance from €190 a month.

— LEAD TIMES
  • Visual configurator of one family: at the low end of the 3–16 weeks.
  • With rules, price and distributors: in the middle; it depends on how many rules there are and whether the test cases are ready.
  • Technical with cutting lists and a connection to the shop or ERP: at the high end. The exact date goes in the proposal.
  • Payment terms: 40% to start, 40% with the test version and 20% at go-live.
— SEPARATELY, PER PRODUCT
  • 3D modelling and materials or finishes: from €30 to €120 per part or finish (or more). It is settled once we see your files; if you already have the models, they are just adapted.
  • The configurator is yours: with no third-party licences and no pay-per-configuration.
  • More detail in the price of a 3D configurator and in how much a 3D configurator costs.
— FREQUENTLY ASKED QUESTIONS

What we get asked
before they build their own.

There are more short answers in frequently asked questions about 3D configurators and who we are in 3D configurator company.

What do I need to build a 3D configurator?

The family to start with, your manufacturing rules, the price list and whatever files you have (CAD, drawings, data sheets, photos or samples). 3D models are not required: if there is CAD it is used and, if not, the product is modelled. And real orders already manufactured, to check that the configurator calculates the same.

Can a 3D configurator be built without having the 3D models?

Yes. Profiles and repeating parts are built from their sections and sizes; complex parts are modelled from drawings, photos or samples. 3D modelling and materials or finishes are priced separately, at €30 to €120 per part or finish (or more), once we see your files.

How long does it take to build a 3D configurator?

Between 3 and 16 weeks depending on the scope: a visual family is at the low end; a technical configurator with cutting lists, distributors and a connection to the shop, at the high end. The exact date goes in the proposal, together with what goes into each phase.

How much does it cost to build a 3D configurator?

Development starts from €6,500 for a visual configurator of one product family; most manufacturer projects fall between €14,500 and €35,000, depending on catalogue, rules and integrations, plus maintenance from €190/month. Separately, per product, 3D modelling and materials and finishes, at €30 to €120 per part or finish (or more).

Can I build the configurator myself with a platform?

For a product with few options, no technical calculation and no calculated price, a subscription platform can do. When there are manufacturing rules, cutting lists, distributors with different price lists or your own brand, you need a bespoke development. We compare them in bespoke configurator or subscription platform.

What happens to the configurator when our catalogue changes?

The price list and the rules live apart from the code: you change them yourself from the panel, with a version, and they are tested against the cases before publishing. Adding products or finishes that need modelling is priced per part, as at the start.

— OPEN DEMO

Try it now
or see it with
your range.

Before building yours, try the 48 open examples, with no sign-up, with sample products and prices, at configurador.grup3d.es/demo. On desktop, tablet and mobile.

With your range in front of you? Send us the catalogue or the price list for two or three of your products and in a 20-minute video call you will see what your configurator would look like and what it would take to build it. No commitment.

Would you rather talk it through? Call us on 662 061 421 or write to grup3d@grup3d.es.